Dreamweaver is a powerful, full-featured tool for building large and complex Web sites. Many of its tools help you build Web sites faster and more efficiently. But are you using Dr
eamweaver to its fullest? In this article, I present 10 tips that I wish someone had given me when I started working with Dreamweaver.
1: Put the Insert Bar in Its PlaceLike most computer programs, Dreamweaver has a lot of different windows and panels. One of the most useful is the Insert panel, which lets you quickly add HTML tags to a page with a click of the mouse. Unfortunately, the Insert panel normally stuck at the right edge of the screen, fighting for space with other useful panels like the Files panel and the CSS styles panel.
You can change this panel into a horizontal, tabbed bar that appears just below Dreamweaver's menus (on Macs) or to the right of the menus (on Windows). There are two ways to move the Insert panel:
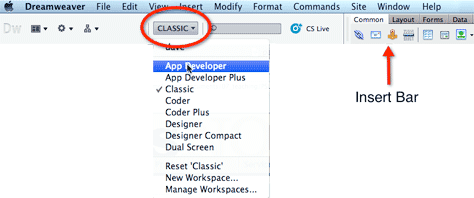
- Choose "Classic" from the Workspace layout menu in the application toolbar
- Grab the Insert panel's tab and drag it into the application toolbar.
2: Save Your Workspace
In the previous tip, I pointed out the Workspace layout menu. Dreamweaver comes with eight workspaces that are simply different arrangements of panels: some hidden, some moved to other locations on the screen. Selecting a workspace re-arranges Dreamweaver's panels on the screen.
Odds are that you'll want to customize the layout of your workspace as well--for example, if you don't use Adobe's Business Catalyst, you should hide that panel. Or if you have a really wide monitor, you might want to move the very-useful Files panel to the right edge of your screen, convert the Insert panel into an Insert bar (see previous tip) and leave other panels on the right edge.
To move a panel, grab its tab and drag it across the screen. If you drop the tab somewhere in the middle of the screen, it turns into a floating panel that covers other panels as well as the document window. However, if you drag a panel's tab to the left, right, or bottom edges of the screen until a solid blue line appears along that edge and then let go, you dock the panel to that edge. So to move the Files panel to the left side of the screen, just drag its tab to the left until a blue line appears and let go.
Once you've organized your panels, go to the Workspace layout menu and choose "New Workspace…" (See Figure 1 above.) You'll then be prompted to type a name for the workspace and save it. From this point on, it's no sweat if you accidentally move panels around or someone else uses your computer and changes the layout. You can always return to your workspace layout by selecting its name from the Workspace layout menu.
Quick Tip: You can focus just on your Web page and hide Dreamweaver's panels and Property inspector by pressing the F4 key. Pressing F4 brings them back. This is a great trick when you're working on a small screen and you want to hide the panels while working on a Web page.
3: Always Define a SiteMany people new to Web design think of a Web page like they think of a Microsoft Word document: Open the page in Dreamweaver, make edits, save it, and you're done. However, being a Web designer isn't about editing a single file, it's about building a site and managing a collection of inter-related files that include Web pages, images, JavaScript files, and CSS files.
People who don't understand this complexity skip the single most important step in using Dreamweaver: setting up a site
Dreamweaver's site setup process is straightforward but very important: It tells Dreamweaver where your site's files are and lets you tap into Dreamweaver's many site-management tools for transferring files to your Web server, checking for broken links, rapid site building and updating with templates and more. Most importantly, it helps make sure Dreamweaver correctly links files and helps avoid broken links between pages and other files in your site.
The site setup process is greatly simplified in Dreamweaver CS5:
1. Choose Site > New Site. The Site Setup window appears.
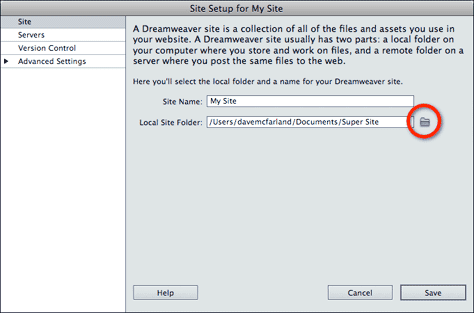
2. Type a name in the Site Name field. This can be anything you'd like: "My Site," "Client A Site," and so on. This name is only used by Dreamweaver.
3. Click the folder icon. A "Choose Root Folder" window appears.
4. Navigate to and select your site's main folder: that's the one that holds your site's home page. This is known as the "local site folder." It's best if you keep only your site's files (Web pages, images, CSS files and so on) here. Photoshop files, Word documents from your client, and all other non-Web files should not be in this folder.
5. Back in the Site Setup window, click the Save button. Dreamweaver now knows about all the files in your site. The site's name will appear in a drop-down menu in Dreamweaver's Files panel. You can set up multiple sites and switch between them as you work by selecting the site's name from this drop-down menu.
4: Use the Files Panel to Manage Files
When you set up a site in Dreamweaver, all of the site's files appear in the Files panel. Double-clicking a Web page in the Files panel opens it for editing. But you can do a lot more with the Files panel.

Dragging a file into a folder moves that file; to rename a file, click it once, pause, then click again and the name highlights, ready for editing. So far, this may sound like something you would do normally with any file on your computer using the Finder or Windows Explorer. However, Web pages are different than regular files. Usually a Web page will have links to other Web pages, display images in the site, and use CSS styles from an external style sheet file. Renaming a Web page, CSS file, or image using the Mac Finder or Windows Explorer will end up breaking links and you site won't work.
However, Dreamweaver knows all about your site, its files, and how they're related. That was the whole point of tip 3! When you move or rename a file using the Files panel, Dreamweaver notifies you and gives you the option "Update Files". Always click the "Update" button so that your links don't break.
5: Make Room in the Files Panel Sometimes the Files panel drives me nuts. If I have a large site with several levels of folders, the panel frequently cuts off the names of files. notice that there's a folder whose name (at least what you can see of it) starts with SpryA, and inside it are two files named only S… Not very helpful.
The problem is that this panel also includes other information, such as the file size and type, that takes up horizontal space in the panel. Fortunately, you can hide all columns except the file and folder names:
1. Choose Site > Manage Sites. The Manage Sites window appears.
2. Select your site from the left-hand list of sites and click the Edit button. (Note that you have to do this for each site because there's no global setting.) The Site Setup window appears
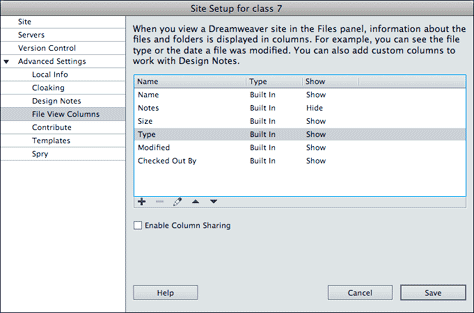
3. Expand the list of "Advanced Settings" and select File View Columns from the left hand list of options
4. From the list of columns select the Size column and click the edit icon (the little pencil). A small window appears
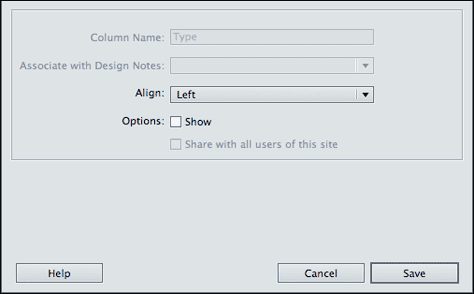
5. Uncheck the "show" box, then click Save.
6. Repeat steps 4 and 5 for each column you wish to hide. I recommend hiding all columns except for the Name column.
7. Click the Save button one last time to exit the Site Setup window, then click the Done button to exit the Manage Sites window.
Only the name of the files should now appear in the Files panel. Dreamweaver still may not display the entire name, so the last step is to drag the column divider line to the right so that the Name column takes up all of the horizontal space.
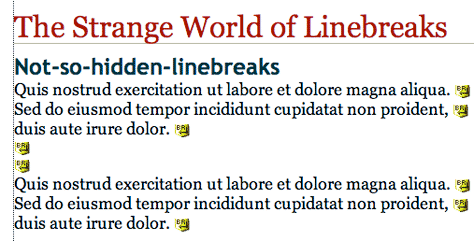
6: Show Line Breaks
When you copy text from an e-mail, text document, or Word file and paste it into a Web page in Dreamweaver, you'll often end up with line break characters at the end of lines and paragraphs. The line break character in HTML is
. It marks the end of a line, so the text that follows it drops down to the next line. Because the
tag is invisible, it's hard to find and remove these pesky critters.
While Dreamweaver doesn't normally highlight these invisible line breaks, there is a preference option you can set to make the app display a small yellow icon indicating a line break.
To turn this feature on:
1. Choose Dreamweaver > Preferences (Mac) or Edit > Preferences (Windows) to open the Preferences window.
2. Select Invisible Elements from the left-hand list of categories.
3. Check the "Line breaks" box
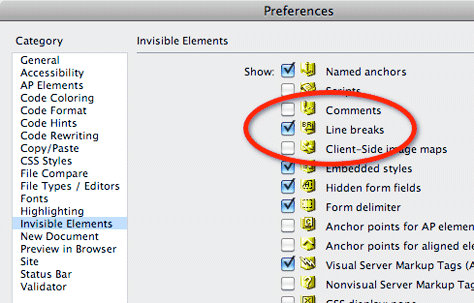
4. Click the OK button to exit the Preferences window.
Now that the line breaks are visible, you can easily remove them. To delete a line break, select the gold shield in your document and press the delete key. This joins the two lines--the one before the line break and the line after it--into a single line. You can also remove the line break and create a new paragraph by selecting the line break icon and hitting the return key. This creates a new paragraph following the line that contained the line break.
7: Remove the Browser Navigation Bar
Dreamweaver CS5 added a browser navigation toolbar to the Document window. This feature is intended to be used with Dreamweaver's Live View option, which you reach by clicking the Live View button in the document toolbar. Live View lets you view the page through Webkit (the engine behind the Safari and Chrome Web browsers) so you can see what the page would look like in a Web browser.
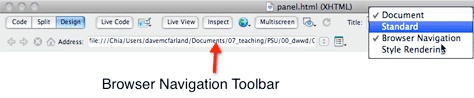
While in Live View you can Command-click (Ctrl-click for Windows) on a link and navigate to that page. The Browser navigation toolbar shows the location of the new page and has back and forward buttons to navigate through the pages you've looked at in Live View. The navigation toolbar takes up valuable vertical screen real estate but is useful only in limited situations.
To hide this toolbar, choose View > Toolbars and deselect the "Browser navigation" option. Or right-click (ctrl-click for Macs) on the toolbar and uncheck the "Browser Navigation" option
8: Use the Tag selector
Precision is important. When you apply a CSS class style to a selection, add a Dreamweaver behavior to an element, or just delete a tag, you want to be sure you've correctly selected the tag. For example, if you want to apply a class style to a paragraph, you might click and drag to select that paragraph's text; but if you don't select all of the text you'll add.
For precise selections, nothing beats Dreamweaver's Tag Selector. Located in the bottom-left of the document window, the Tag Selector displays the HTML tag and all of the tags that wrap around that tag.
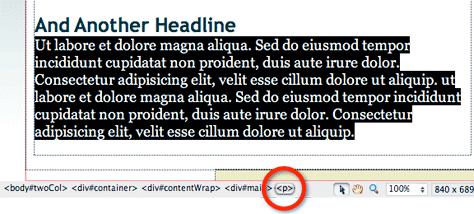
For example, if way back in Tip #6, I clicked inside a paragraph (p) tag. That paragraph is inside a (div) tag with the ID of #main (the tag selector displays that like this: (div#main). That (div0 tag, in turn, is inside to other divs, and all of those tags are inside the (body) tag.
Clicking a tag in the Tag selector, selects that tag on the page; in addition, Dreamweaver highlights that tag in the Tag selector, indicating that the tag is selected
9: Increase the Font-size in Code View
Dreamweaver assumes that people who work directly on HTML, CSS or JavaScript code have really good vision. At least that's what it feels like when you click the Code button to jump to a screen full of tiny, 9pt text. In my Dreamweaver classes I often see students with their faces pressed right up to the screen as they look at a page's raw HTML code.
Save your eyesight! Here's how to change the default size of this text:
- Choose Dreamweaver > Preferences (Mac) or Edit > Preferences (Windows) to open the Preferences window.
- Click the Fonts category.
- Select a new size from the Size menu (it's to the right of the Code View setting). I like 14pt type.
- Click OK to close the Preference window.
Cascading Style Sheets (CSS) are a powerful tool for a Web designer. CSS changes drab HTML into an elaborate and beautiful design. But it can also be complicated to learn and use. One weird quirk is the shorthand version of the Background property.
CSS background properties let you add background colors and images to an element and control how a background image tiles. Each of those properties has its own name. If you wanted to put a color and image and prevent the image from tiling, you might have CSS code like this:
background-color: #F44333;
background-image: url(logo.png);
background-repeat: no-repeat;
That's a lot of code, so Dreamweaver usually uses the background shorthand property, which lets you roll all three of these properties into one:
background: #F44333 url(logo.png) no-repeat;
This is a lot less code, and it may seem useful, but it can have some weird side effects. If you leave out a property in the shorthand version, a Web browser treats the unspecified properties as "none." That makes background: url(logo.png) the same as this code:
background-color: none;
background-image:url(logo.png);
Suppose there's already a style applied to an element and that style has a background color? If you create a new style for that element and only specify a background image, then the Web browser removes the color from the other style. I encounter this problem a lot when working with navigation bars. I'll create a generic style for all of the buttons in a bar, like this:
#navigation a {
color: #FFFFFF;
background-color: #48DD3F;
}
Usually there's a lot more CSS properties for the links, but I'll keep this example simple
Let's say that I want to add different icons in the background of each button. For example, I might give each button its own ID so I can style it individually. Now I want each button to keep the basic properties of the #navigation a style (including the background color which is the same for all of the buttons) but add a different image to each button. Suppose one button had the ID of home applied to it. If I use Dreamweaver to create that style, with its default CSS shorthand settings, I'd end up with a style like this:
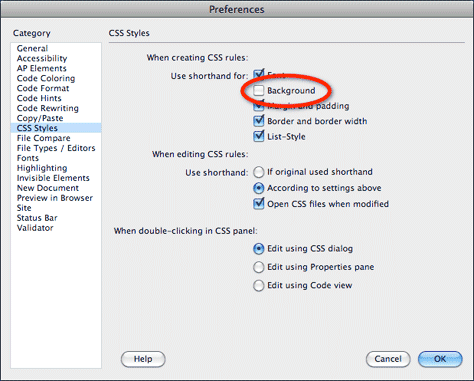
1. Choose Dreamweaver > Preferences (Mac) or Edit > Preferences (Windows) to open the Preferences window.
Click the CSS Styles category.
Uncheck the Background box.
Click OK.
Now Dreamweaver will use the individual background properties whenever you create a new style.
You can learn more about
No comments:
Post a Comment